Through the method of rotation and collage, I achieved a form in my last blog post. From there, I took the idea into FormZ and did the exercise again. After achieving a perspective of the model in FormZ, I printed the perperspective out three times. I continued the method of collage and rotating the perspective. I intersected the perspective three times with itself and achieved a new type of spatial overlap and order. From there I used the concept of rotation and realized the perspective works both right-side up and downside up. Ceiling seemlessly became ground and ground seemlessly became sky. Both perspectives hinted at a different type of spatial overlap and order. Both are the result of applying concepts of the linear gallery to the method I have outlined. My process as well as my final boards are below:
Process:
Final Board:
Tuesday, December 13, 2011
Tuesday, December 6, 2011
Final Project: Methodology and Process Work 1
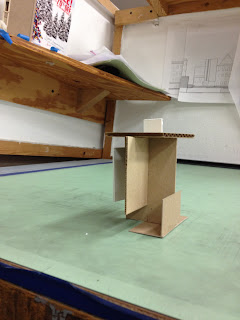
Since my project is conceived through planes, I began my beginning process work by modelling solutions to the problem with various materials. The process began by cutting out different shapes of chipboard, strathmore, and cardboard. All had to be seemingly different sizes. I then began haphazardly placing the materials on each other. The final output of this model is below:
This process turned out too random of a figure with undefined spaces. The linear gallery is a much more defined place, so I began to refine my method. The following procedure and restrictions are how I executed the remaining four models.
I began by cutting seven pieces of materials out at different sizes. Two pieces had to be strathmore, two had to be cardboard and three had to be chipboard. The pieces could not be the same size or orientation. If one was narrow, the other had to have the dimensions similar. I then began by selecting a single plane and orienting it so it became either a ground plane or ceiling plane. I then selected a different material and applied it to act as a wall. I then rotated the model so the new piece became either a ground plane or ceiling plane. I selected the remaining material that had not been used yet and applied it as a wall to the plane. I continued this method of selection, rotation, and application until all of the material had been used. The three materials symbolize the three different program aspects of the project. Perhaps where a change in material occurs, a new function could take place. The following models were the output of this procedure:
Model 2:
Model 3:
Model 4:
Model 5:
The method could be modified even more to become more rigorous. Instead of eyeing a plane for its dimensions, I am now going to specify dimensions that the planes need to be. One plane needs to be X' by 3X' and the other needs to be X' by X'.
Final Project: Concept
Linear Gallery as Overlapping, Intersecting, and Shearing Planes
At its essence, the Linear Gallery isn’t the resultant space of a subtraction. Rather, the space is the result from adding and intersecting three planes. Because it is missing definition on one side, the space opens up and feels lighter. The piers break up the bays, but aren’t perceived as points. The piers have a thicker horizontal dimension and upon entering the space, they become planes invading, breaking up and delineating new spaces that overlap the gallery. I will not only study the form of the gallery by intersecting, shearing, and overlapping planes, but I will also study how this method will give way to the creation of new spaces for collaborative as well as conflicting programs. My logo design uses this idea to spell out the word “Gallery”. It takes the idea of lines overlapping to create and furthers the concept.
Subscribe to:
Comments (Atom)


